Host WordPress Locally with the WAMP Server
We develop skills, we use them, we learn better ways to do things, we abandon the old tools and techniques, we get old…
Such is the life of a developer. In a previous article, I wrote about using Bitnami to setup a host environment for running WordPress locally and then using Updraft Plus to clone/migrate a WordPress site into that environment. Bitnami installs and configures an Apache Server to work with WordPress and then installs a basic WordPress site into which we can clone any other WordPress site. Recently I’ve learned a more efficient method for setting up a local development environment on Windows. In this article I describe how to install Apache directly and use it to serve WordPress. Not only does this remove a layer from virtual hosting, the WAMP server provides updates via an installer where Bitnami does not.
WAMP is the Windows version of a server package consisting of Apache Server, MySql, and PHP. There are also MAMP & LAMP for the greater and lesser operating systems (not necessarily in that order).
No updates at this time for Updraft Plus, so with no further ado:
Download/Install WAMP from the WAMP Website
The install screen includes a pretty extensive list of Microsoft libraries required for a successful install and they have a tool to check your computer to see what’s missing. The checker found that I was missing many of the libraries. I ran the install anyway and so far WAMP is running fine on 2 computers. If it didn’t work, I’d stop here — it would be a daunting task to install all of the MS libraries, and I wouldn’t trust that they wouldn’t screw up my Windows install. In that event I’d continue to use Bitnami or one of the other server environments rather than installing WAMP. Flywheel Local was recently acquired by WP Engine, so I’d give that another look.
During install, WAMP will setup Internet Explorer as its default browser and Notepad as it’s default editor. The installer offers the option to choose different programs for each. I changed them to Chrome and Visual Studio Code.
WAMP wants to be installed in the root of a drive. The default is C:\wamp64. I’ll use that for the examples in this article.
Upon completing the install, WAMP presents a screen with additional info — this is worth reading. It includes a section on Virtual Hosting, which is how the WAMP server associates your local files with URLs that it can serve. While not absolutely necessary, it is valuable to understand how it works and is IS NECESSARY to understand if you want to use a customizable hosting setup. FWIW, the WAMP devs recommend always setting up a virtual host and that is the approach I’m using in this article. Close the info screen.
Launch WAMP from the start menu (it should be at the top of the “Recently Added” list). You might see a command shell appear briefly (actually 3 shells, presumably for each of the the apps), but other than that there is no windowed UI. What you will find is the red WAMP icon in your system tray. Click the icon and choose “Start All Services”. If all goes well, the icon will change from red to orange, then green and you will be good to go. Click on the Green WAMP icon and choose “Localhost”. This serves the WAMP home page in your browser. Congrats, you are now serving your own web pages! Local WordPress is only a few minutes away.

Install WordPress/Virtual Host
There are many tutorials and approaches for installing WordPress (WP). This one is different. I’m not going to get into the hows and whys of the procedure, just to say that after some trial and error and some assistance from a very experienced developer, I’ve arrived at this approach. Here are the quick steps I’ve found reliable. Steps 1 and 2 and copying the WP files in Step 3 can be done in any order. The WP install should be done last.
1. Setup Virtual Host
In my limited experience, I encountered some configuration issues when setting up a virtual host after the WP install, so we’re going to do that first.
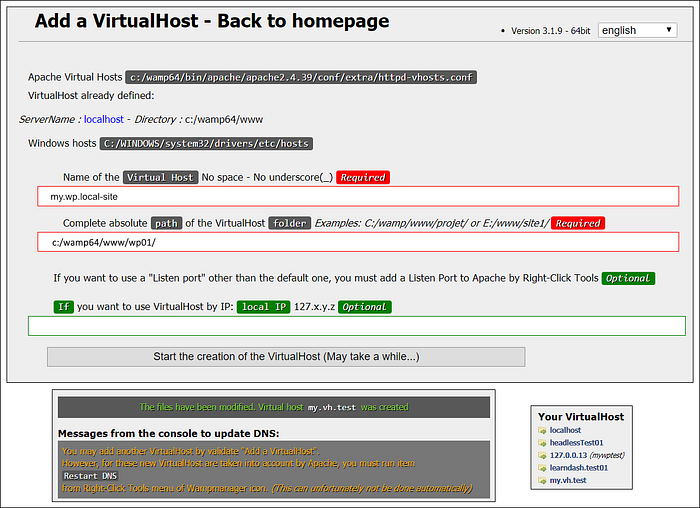
From the WAMP icon in the system tray, launch localhost to open the WAMP home page. In the Tools section choose “Add a Virtual Host”.

For this tutorial I used these values (note the forward slashes and closing slash in the path):
my.wp.local-site
c:/wamp64/www/wp01/
You will see that VirtualHost setup provides the option to use a local IP. From my experience the named virtual host will not work if an IP is also setup (but the ip will work).
Restart all services via the WAMP menu in the system tray, then revisit LocalHost and you will see a link to your new virtually hosted local site.
As noted on the Virtual Host setup page, you’ve modified 2 text/configuration files with new the virtual hosting data. The paths, more or less, are:
C:\wamp64\bin\apache\apache2.4.37\conf\extra\httpd-vhosts.conf
C:\Windows\System32\drivers\etc\hosts.
At some risk you can modify these with-in the params of the virtual hosting and restart WAMP to update the settings.
2. Create a Database for WordPress
From the WAMP icon in the system tray, launch phpMyAdmin. You will be asked for a user name and password. Use the default username of “root” (without quotes) and there is no password, which means that you must leave the Password box empty.

In phpMyAdmin create New DB. Don’t need to create tables. For tutorial purposes, I’m using anyOldDB. It will be stored as lowercase.

3. Setup WordPress
A. Copy the files
Download the latest WordPress and extract the files — they will be in a “WordPress” directory.
WAMP will have created a “www” folder for storing websites. This fulfills the same purpose as “public_html” at a hosting service. Create a new directory inside the www folder for WP. For example, C:\wamp64\www\wp01.
Copy all the files in the WordPress directory to C:\wamp64\www\wp01. Because we are using virtual hosting you could copy the WP files to any directory on your computer.

B. Run the Setup
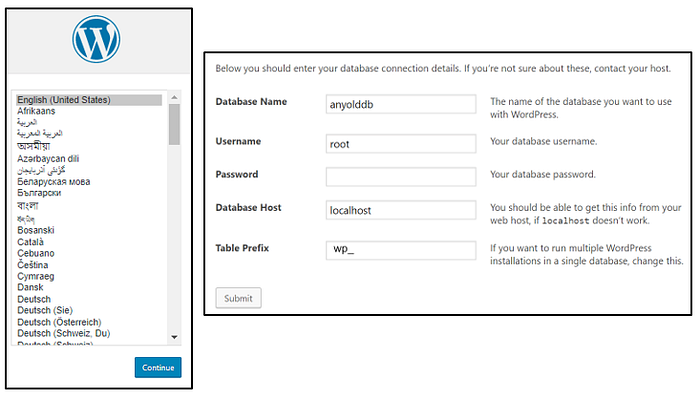
In a browser, visit my.wp.local-site or whatever url you set as your virtual host. You will be presented with the WP setup screens.

Choose Language.
Database name: anyolddb
Database username: root
Database password: blank for now
Database host: localhost
Table prefix: Leave at default (wp_) unless you want to run more than one WordPress in a single database.

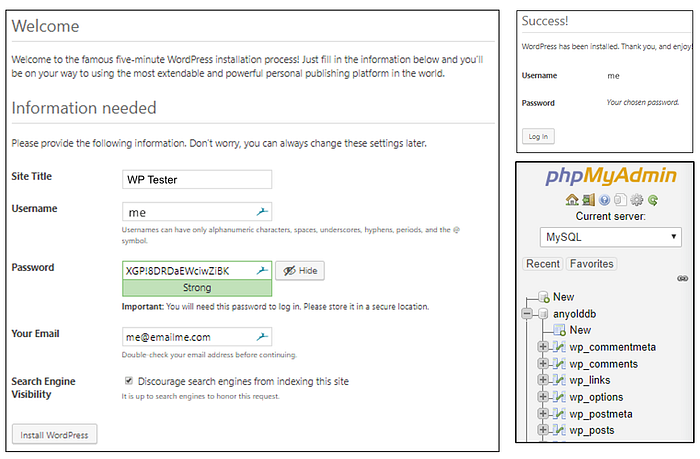
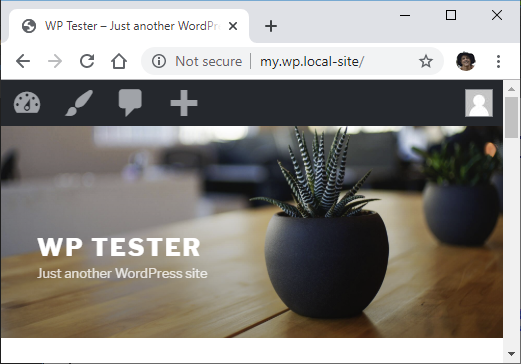
Voila! You are now hosting WordPress locally! If you can open the DB in phpMyAdmin and see that new tables have been added.

Delete Site
To delete a site you simply remove the root wp folder, the database, and the entries in httpd-vhosts.conf and the Windows hosts file.
To remove the database: phpMyAdmin/Click the DB/Operations/Remove or Drop.
